Watch the Tutorial
Learn how the Moneris® Go Plus Handheld POS Terminal makes Fair checkout quick and easy!
Learn moreLooking for something specific?
Find the answers you’re looking for below!
IMPORTANT NOTE: Not all schools will receive the Moneris® Go Plus Handheld POS terminals. These instructions are for schools with this device only.
Equipment Set-Up
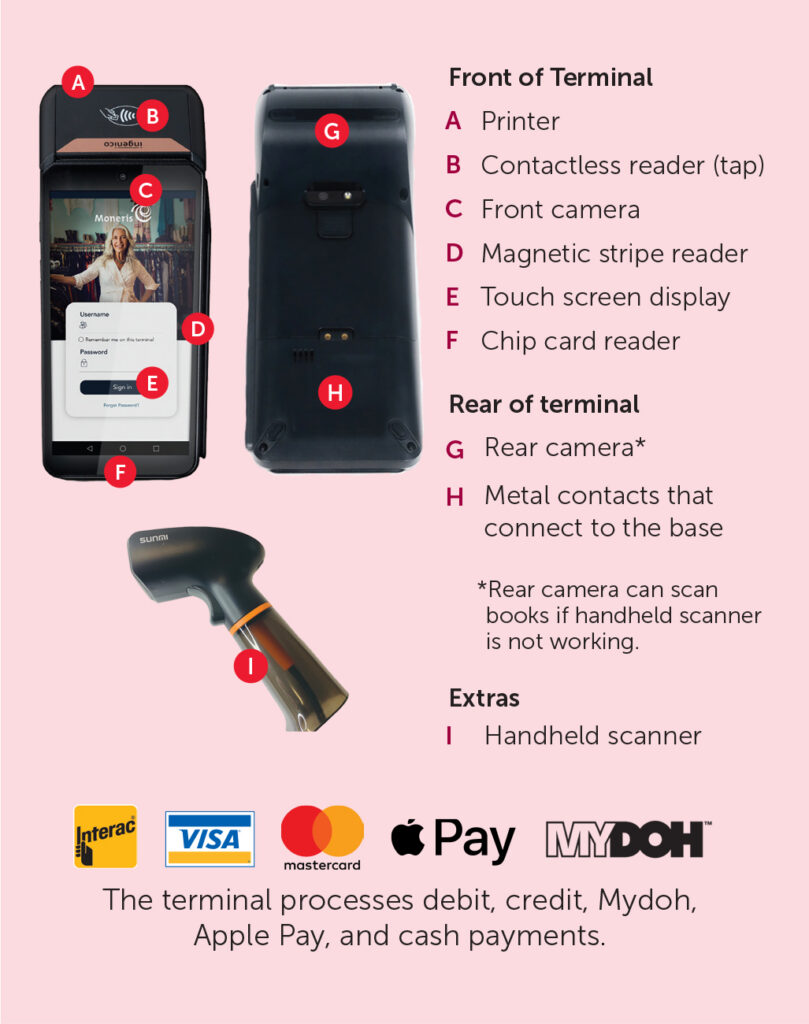
Your tote/box includes:
- Terminal
- Charging base
- Handheld scanner
- Power cord & adaptor
- Paper rolls
Setting up the base:
- Turn the base upside down.
- Plug the power adaptor into the base, then into a wall outlet.
- Plug the scanner’s USB cable into either USB port on the base.
- Wait for the scanner to beep and the small light on the left side of the base to turn on.
TIP! Keep the base plugged in at all times. It powers the scanner and maintains the connection with the terminal.
Base light indicators:
- Red: Base is powering on
- Flashing green: Pairing in progress
- Solid green: Paired and ready
Your terminal arrives pre‐paired. If the light is not solid green, you can re‐pair it below.
Connecting the Terminal
By default, the terminal uses a cellular network. If your school’s cellular signal is weak, causing lag, buffering, and other connectivity issues with the device, you can connect via Ethernet or secure WiFi.
Learn moreTerminal and Base Pairing
Your terminal and base should already be paired. If they become unpaired, follow these steps.
1. Power the base
- Ensure the base is plugged in throughout pairing.
2. Power on the terminal
- Press and hold the power button on the left side of the terminal for five seconds until the screen turns on.
3. Start pairing
- Hold down the power button until the menu appears, then tap Base.
- If you see No base can be found, continue to the next step.
4. Scan the base QR code
- Tap the small scanning icon [–] in the top right corner.
- Lift the terminal off the base.
- Turn the base over and scan the QR code.
- If you see Invalid barcode, tap OK and try again.
TIP! Place the base on a steady surface for easier scanning.
5. Confirm pairing
- When Connections Available appears, tap Pair base.
- The terminal will connect to ING2.4G_XXXXXX (the base).
- When Pair Successful appears, tap OK.
- If you see Peripheral has been occupied…, select YES. This confirms the base is communicating with the terminal.
6. Return to the main screen
- Tap the navigation button ▪ at the bottom of the screen.
- Open the Go Retail app.
IMPORTANT! If the login screen doesn’t include a field to enter your password, please swipe the screen closed and then tap the Go Retail app icon to launch the correct app.
7. Connect the USB scanner
- Plug the scanner back into the USB port. It will beep to confirm it’s connected.
Powering on the Terminal
1. Locate the thin power button on the left side of the terminal. Press and hold the button for five seconds until the screen lights up.
2. The device will display the blue Ingenico logo, then cycle through startup screens for about 60 seconds.
3. When the white time/date idle screen appears and stays for at least 30 seconds:
- Swipe inward from the left edge of the screen.
- Tap Exit from the menu.
4. On the next screen, tap the Go Retail app to launch it.
Logging In
1. Tap the Username field and enter the username printed on the green label on the underside of the terminal. Tap the Password field and enter the matching, case-sensitive password shown on the label.
2. Tap Sign In to access the POS system.
Important notes:
- Each terminal has its own unique username and password. Use the credentials that belong to that specific device.
- If you see a login screen that doesn’t include a field to enter your password, you’re in the wrong place. The correct login screen requires a password and features a blue sign-in bar.
- Tap the square navigation button at the bottom of the screen.
- Swipe up to close the app.
- Reopen the Go Retail app from the main screen.
TIP! Tap the globe icon in the top right corner of the login screen to switch to French.
Using the Terminal and Scanner
Important notes:
- The terminal works on or off the base.
- The base must stay powered for the handheld scanner to function.
- For the best battery life, keep the terminal on the base whenever possible.
Scanning a transaction:
- Tap Scan near the top right side of the screen.
- Aim the handheld scanner at the barcode and squeeze the trigger.
- A beep will confirm the scan, and the item will appear in the cart.
- Continue scanning all items the customer is purchasing.
- Review the cart to ensure all items and quantities are correct.
- Tap View Cart to view the Order Details screen, including items, prices, and total amount due.
IMPORTANT! Review the items in the care BEFORE processing payments. The unit is UNABLE to process voids or refunds.
Customer paying with debit, credit card, or Mydoh:
- On the checkout screen, Pay with Card is selected by default.
- Tap Pay with Card.
- Have the customer tap or insert their card.
- Wait for approval, then tap OK.
- Tap No Receipt unless the customer requests one.
Receipt details:
- A Merchant Copy prints automatically for debit/credit transactions. Keep this copy to submit with your Financial Form.
- If you choose Print Receipt, both a merchant and customer copy will print.
- Tap New Transaction, then tap Scan to prepare for the next customer.
IMPORTANT! Keep the Merchant Copies from the debit/credit portion for your Financial Form.
Customer paying cash:
- Tap Checkout.
- Confirm the total, then tap Cash.
- Enter the amount of cash received (including the decimal). The terminal automatically calculates change.
- Tap Tender Cash to accept.
- A Payment Complete message will appear.
Receipt details:
- Cash receipts do NOT print automatically. Print only if the customer requests one.
- If the customer chooses a Print Receipt, hand them the printed copy.
- If they choose Email/SMS, turn the terminal towards them so they can enter their information.
If accepting cheques, process them as Cash. Cheques must be payable to your school.
Processing sales with multiple payment types:
- On the checkout screen, select Cash.
- Enter the amount of cash received and tap Tender Cash.
- After the cash portion is approved, you’ll return to the checkout screen.
- Select Pay by Card and complete the payment as usual.
TIP! Itemized receipts don’t print automatically. If needed, print them from the Payment Complete screen only when requested to keep the line moving.
Redeeming Product Rewards:
- Scan all items being redeemed.
- You can scan up to 75 unique titles per transaction.
- Scanning may slow down as the cart grows.
- Tap the three dots beside Actions and tap By Percentage (%).
- Apply a 100% discount to the entire transaction, then tap Checkout.
- Select Cash, then tap Charge to complete the transaction.
- Print the itemized receipt for your records and include totals on your Financial Form.
TIP! If you process multiple reward transactions, manually add all totals together for the Product Taken section of your Financial Form.
Redeeming certificates:
This includes webinar certificates, teacher coupons, and other Book Fair-issued certificates.
- Scan all items being purchased. Verify that the total meets the minimum specified on the certificate (if applicable).
- Tap the three dots beside Actions and tap By Value ($).
- Enter the dollar value of the certificate.
- Complete the remaining balance using cash or debit/credit.
- Include all redeemed certificates in your prepaid return envelope with your Financial Form.
End of Day Process
Run this report every day and for each terminal you received. The system does not generate a combined summary automatically.
How to print the End of Day Summary:
- On the navigation bar, tap More, then tap Reports. The screen will automatically show the current day’s report.
- Tap Print at the bottom of the screen to print the End of Day Summary.
- Save all printed reports—you will need them to complete your Financial Form.
- To return to the POS screen, tap the Products icon and you will be returned to the main screen.
If you missed a day:
- On the navigation bar on the bottom of the screen, tap More, then tap Reports.
- Select the specific date you missed from the calendar.
- Tap Apply, then Print.
- Repeat for each missing day.
Packing Up
When your Fair ends, pack all components back into the tote/box they arrived in.
Before packing:
- Power off the terminal.
- Unplug the scanner.
- Unplug the power cord and adaptor.
- Place all components securely in the tote/box.
Items to pack:
- Terminal
- Base
- Scanner
- Power cord & adaptor
- Any unused paper rolls
Return instructions:
- Case Fairs: Place the tote/box on top of one of the metal cases for driver pickup.
- All other Fairs: Return the POS unit and components in the original box.
Submitting Financials
Complete this section after your Fair has ended.
1. Log in to the Host Hub
Go to bookfairs.scholastic.ca/login and open your Financial Form.
2. Use your End of Day reports
Do NOT use the Overall Summary. The Overall Summary at the top of the report overstates earnings and will delay your Fair’s finalization. Always use the detailed sections instead.
- Cash & cheques
- Record the actual cash and cheque totals you have on hand.
- If your on‐hand cash differs from the report, use your on‐hand amount (minus the starting float).
- Differences can occur if cash sales were taken without scanning.
- Debit/credit totals
- Add together the Net Totals for:
- Debit (Interac)
- Visa
- Mastercard
- Combine these totals across all days and all terminals.
- Enter the combined amount in the Debit/Credit Card box on your Financial Form.
- Add together the Net Totals for:
3. Enter product taken (if applicable)
If you chose to take product off the Fair as part of your earnings:
- Enter the amount in the Grand Total of Product Taken Off the Fair field on your Financial Form.
- Use your printed itemized receipts from reward transactions to calculate this total.
4. Submit your financials
Follow the prompts in the Host Hub to confirm and submit your Fair’s financials. If you’d like to pay your Total Amount Due using the device, visit schol.ca/x/hg for instructions.
How-Tos & Troubleshooting
Screen turned off
If the terminal screen goes dark, it has entered Power Saving Mode.
- To wake the screen:
- Briefly press the power button
- If the idle screen (time/date) appears:
- Swipe inward from the left side of the screen.
- Tap Exit to return to the POS transaction screen.
Reprinting a receipt
- On the navigation bar at the bottom of the screen, tap Orders.
- Find the order you need.
- Tap the > beside the order.
- Tap the order again, then tap View Receipt.
- Tap Print at the bottom.
- Use the back arrow to return to the list of transactions.
- To return to the POS screen, tap the Products icon and you will be returned to the main screen.
Custom Item
Use a Custom Item for:
- Items that frequently fail to scan.
- Last copies with no barcode available.
- Missing barcodes on the barcode sheet.
- Payment-only transactions when connection is weak.
Do NOT use Custom Items for:
- Large batches of unscanned cash sales due to high volume.
To enter a Custom Item:
- Tap Custom Item under the search bar.
- Enter the price using a decimal.
- Tap Add to Cart.
Scanning errors
If you see “No matches found of the scanned product”:
- Wait three seconds for the message to clear.
- Try scanning the item again.
- If it still doesn’t scan:
- Tap X to return to the main screen (your cart will remain).
- Tap Custom Item, enter the price, and tap Add to Cart.
- Tap Scan to continue scanning other items.
Using barcodes for posters & School Tool items
- Use the provided barcode scan sheets for items with small or hard-to-scan barcodes.
- Keep the sheets at the cashier table for quick access.
- If no barcode exists, use Custom Item.
Removing an item scanned in error
To remove a single item, swipe left on the item to move it to the trash.
To adjust quantity:
- Tap the item you want to change the quantity of.
- Tap Update Quantity.
- Use the keypad to enter the new quantity.
- Tap Update.
To clear the entire cart:
- Tap the three dots beside Actions.
- Select Clear Order.
- Confirm by selecting Yes.
Checking a price
- Tap Scan.
- Scan the item to view its price in the cart.
- Swipe left to delete it if the customer is not purchasing it.
Searching for an item
- Tap the search bar on the main screen.
- Enter the ISBN (no spaces) or a keyword from the title.
- Tap the item to add it to the cart.
- Tap Scan to continue scanning additional items.
Changing the receipt paper roll
- Lift the printer latch on top of the terminal to open the cover.
- Insert the new roll with the paper feeding from the bottom toward you.
- Pull out about 3cm of paper.
- Close the cover firmly until it clicks.
IMPORTANT! If the roll is installed backwards, the printer will produce blank receipts. You can always reprint any missed receipts by following the instructions here.
Powering off
- Ensure the terminal is not connected to a power source.
- Press and hold the power button for 3 seconds.
- Select Power Off from the menu.
- The screen will display Shutting down… and turn off.
Handheld scanner issues
- Unplug the USB scanner, then plug it back in. A beep will confirm it has powered on.
- If the terminal is using the camera to scan instead of the handheld scanner:
- Tap Hide Camera to switch back to the handheld scanner.
- Tap Show Camera to use the terminal’s rear camera if needed.
- If the scanner adds extra items, try restarting the app:
- Tap the three lines in the top left, select Logout, then log back in. Tap Scan and restart the transaction.
Screen is dim
- Swipe down from the top of the screen.
- Swipe down again to expand the menu.
- Move the brightness slider (green bar) all the way to the right.
- Swipe up twice to close the menu.
Terminal Charging Screen
A black screen with a white battery icon means the terminal is off but charging on the base. To power it on, lift it off the base and press and hold the Power button for 5 seconds.
We’re Here to Help!
If you’re still experiencing issues, call our Customer Service team for scanning and product related support at 1-800-268-3860.